Wednesday, December 8, 2010

Oil and Fabric Do Not Mix

“The reason canvas is primed is to protect the fabric from the paint. With acrylics this isn't much of an issue, but with oil paint the oils will, with time, cause the fabric to deteriorate and become brittle.” 

What?  No!  It can't be!  It is?  Oh my!

“Unfortunately, fabric painted with oil paints will deteriorate over time, and that is why canvases must be primed before use with oil paints” 

Recently, there has been a flood of books, videos, tutorials, etc. that promote embellishing quilt blocks with Oil Pastels, Oil Sticks, and Paint Sticks.  This technique seems especially popular with applique needle artist.  Many that work in the Baltimore-style blocks are using this technique to stencil and shade flowers, sailing ships, vases, fruit, etc.  I have also seen this technique used to highlight quilting designs on whole cloth quilts.  The effect is amazing and seems to bring the designs to life.  However, what most quilters do not know is that this artist material damages fabric and may be quite toxic.
All artist grade pastels, even the wax-based or chalk type, contain pigments.  The higher the pastel quality, the higher the pigment content.  Many pigments are toxic so each color must be checked to see if it’s safe.  This excerpt is taking directly from the product description on the Dhama Trading Company’s website.
“All colors of Shiva Professional Grade Artist's Paintstiks are AP non-toxic, with the exception of Cadmium Orange, Cadmium Red Deep, Cadmium Red Scarlet, Cadmium Yellow, and Cobalt Blue, which bear the ACMI Caution Label. Those particular colors are not intended for use by or for products for children 12 and under.”   
Working with toxic pigments is dangerous.  Applying it to a quilt top that will live in someone’s home is probably not a great idea either. 

Even if you do your research and only select the safest pigments, you are still left with the risk of damaging your quilt. In the 15th century, painters discovered that the oil used to bind the pigment in paint would deteriorate the painting support – usually wood and later on fabric. They began to apply a sizing or ground to the support that acted as a barrier between the fabric (or wood) and the oil. I am personally very grateful that the early painters discovered this prior to the Renaissance or we would not have some of the magnificent paintings we do today because they would have crumbled and cracked away into nothingness.


You can read all about the history and evolution of formulas and techniques for protecting the painting’s support in one of my favorite technical books , “The Artist's Handbook of Materials and Techniques: Fifth Edition, Revised and Updated” by Ralph Mayer.

As I write this, I can hear all my blog readers screaming, “Say it ain’t so!  I LOVE my stenciling, I love my embellishing techniques!”  Not a problem - you can still use all of your techniques safely and ensure the permanence of your quilt by switching a few of the key materials.
Before I fill you in on my preferred materials, I would like to make clear that I have no affiliation with any of the manufacturers, distributors, or suppliers of any of these artist’s materials discussed in my blog.  My preferences are based solely on my personal experience using these products.  Your experiences may differ.  I encourage each of you to try a range of products to find what works best for you.

That being said, I only use water-based or wax-based, non-toxic artist materials directly on my fabric.  My favorite water-based media is All-Purpose Ink by Tsukineko (pronounced Soo - Key – Necko).  My favorite wax-based media is Prismacolor Pencils.
I heat set all ink work by laying a white paper towel over the area and pressing with a hot iron.  
I heat and chemically set all color pencil work.  First, I heat set by laying a white paper towel over the area and pressing with a hot iron.  When the fabric cools, I apply an infinitesimal dab of Jacquard Textile Color in Colorless (#100) with smallest brush I can find. Apply in tiny dabs.  I let the area air dry.  I then heat set again with the paper towel and the hot iron.  From a time management perspective, I don’t recommend pencil for large areas because you could be dabbing for days.

Some of you may recognize the block at the top of this posting.  It is “The Brickmaker’s House” from Elly Sienkiewizc’s book “Baltimore Elegance. This is the block that I made, at Elly’s request, for the book.  Notice that the bricks in the brickhouse are two different sizes – one size for the main house and a smaller brick for the chimneys.  I was not able to find any commercially printed, brick texture fabric that was the correct scale.  Therefore, I cut out freezer paper stencils of the brick patterns and made my own fabric using All-Purpose Ink by Tsukineko.   See my tutorial page, Stenciling with Inks, for tips on how to use artist’s inks to embellish your quilts.

We are about to go into full holiday mode so this is probably my last entry for 2010.  I wish all my blog readers a very Merry Christmas surrounded by the people you love and a Happy, Healthy New Year filled with your best stitches!

Wednesday, November 17, 2010

Back Basting Takes Flight - In Reverse!


I love all types of appliqué. I get just as excited about intricate, perfectly placed, 100-plus piece per block, Baltimore-style blocks as I do a single folk art heart. Most of the time I am happy stitching on something in between the two extremes. Sometimes I just need it to be simple. These days I am in my Simple Zone.


However, what if I need it to be simple to mark and stitch but I want it to look complex? I have two favorite techniques to accomplish this. The first is to set the block on point. Any block will look more complex this way. Suddenly your piece is bigger and you now have beautiful setting triangles to quilt beautiful motifs.


The second technique to transform the look of simple into complex is also one of my favorite, easy appliqué techniques - reverse appliqué! Traditional appliqué has the stitcher place the appliqué fabric on top of the background fabric. The appliqué fabric is stitched onto the background. In reverse appliqué, the appliqué fabric is placed UNDER the background fabric. The background is cut away to reveal the appliqué fabric underneath. The background is stitched to the appliqué fabric. You can layer several pieces of fabric to make the appliqué look more complex but it's all easy because everything is securely basted in place.

Here is a green rosebud that was appliquéd onto an aqua background. The center of the green rosebud was reverse appliquéd to reveal a hot pink, polka dot fabric placed underneath. Looks difficult but is very easy to execute. The added benefit of using the Template Free or Back Basting technique for reverse appliqué is that the basting stitches secure everything in place and removes any risk of fraying and of fragile pieces coming apart or shifting. Refer to my blog entry Pinch of This and Dash of That for details of how I stitched this bud


I am currently working on a challenge piece for my local guild, Ocean Waves.  My initial idea and sketch was a little more intricate than I really have time to execute.  Out comes my bag of tricks.  I knew I wanted the peacock feather eyes in the finished piece but I wasn't willing to appliqué 20 plus sets of concentric circles.  
My peacock fabric was perfect but I did not think fussy cutting and appliquéing them onto the tail feathers was the right look.  Then the heavens parted, a ray of light shone down, and I heard a choir of angels singing in perfect harmony.......reverseeee  appliqueeeeeeee........amennnnnnn......

Yes - I had a plan.   I studied the peacock feather fabric and realized I would not even have to cut it apart.  I would cut a chuck of the fabric in the shape I wanted the peacock's tail to take.


I then placed the peacock feather fabric face down (wrong side up) on the wrong side of the fabric I was going to use to stitch the main tail. 

I basted all around the outside of the feather fabric to hold it in place.  I then basted (using smaller stitches) around each eye in the feather fabric.  I shaped each teardrop a little differently to add visual interest.  I basted larger teardrops as I move to the bottom of the tail.  I changed the direction of the teardrops to give the tail some movement.  

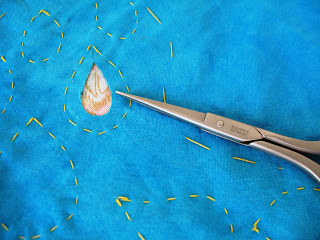
After all the basting was complete, I appliquéd a single eye to make sure this was indeed going to work and give me the look I was hoping for.  Reverse appliqué is stitched from the top - the right side of the background fabric.  This is easy to do because the basting stitches exactly mark the turn line.
 I prefer to use a seam ripper to make the initial slit in the background fabric.   


I then used my sharpest pair of embroidery scissors to trim excess fabric and leave only the scant 1/8 inch seam allowance.  
I clipped to the turn line in the cleft at the top of the teardrop.  I made several shallow clips perpendicular to the turn line in the concave, u-shape, bottom of the teardrop.  See my tutorial Clip, Clip, Snip, Snip for a refresher on proper clipping techniques.  


I finger pressed my seam against the basting stitches to help score the turn line. 

I was ready to stitch.  I appliquéd the teardrop shape.  YES, it was exactly the look I wanted and the feather eye was centered in the teardrop opening.  
I was able to trim the blue tail fabric so that I would have  a smaller piece of fabric to gather in my hand while I stitched. 
 I also pre-trimmed all the teardrops shapes so that I could preview the tail section.  Fraying was not a worry because everything was securely basted.  This was now a sturdy piece that can travel in my handwork bag. 

Here is a sneak peak at how the tail will be incorporated into the design.  For the rest you will have to wait until after my guild challenge in January.

The design idea, sketch, fabric selection, basting, and stitching were all completed in an afternoon.  For those of you that do not know me - this is a record.  I am going to have to come up with more designs that I can use this technique on.  Fast, fun, and freeform thanks to Back Basting! 

Best Stitches,

Mercy in Miami

Tuesday, October 26, 2010

By Machine or By Hand? Plus a New Tutorial, a New Book, and a New Blog recommendation!

I love all styles of appliqué.  In fact, I'd be hard pressed to find an appliquéd quilt or pattern that I didn't like.  And even though I enjoy drafting my own designs, I really get pleasure from working on other appliqué artist's patterns.  Therefore, this year I was thrilled when I received several appliqué patterns for my birthday.  The three styles could not possibly be any more different!
Roseville Album
Civil War Bride
Baltimore Christmas
So now, the question is BY MACHINE OR BY HAND. The answer is "I am not sure?” If time were an endless commodity I would hand needle turn everything. However, time is a finite, consumable resource in my world. Moreover, I am burdened with the guilt of a big, beautiful, top of the line sewing machine that is not getting as much use as it should. Hmmmmm??? What to do, what to do?

I know many other appliqué lovers share my same or very similar predicament so I'm sharing my decision making processes with you, not with the intention of swaying you one way or another but, to help you think through your own likes and dislikes and be able to reach your own choices
My artistic dilemma is that I don't care for the look of obvious machine work on pieces where the design is noticeably from an older era. Typically, I reserve machine stitching (at least the kind that shows) for more contemporary designs. Based on that logic,  Roseville Album 
will most likely be machine appliquéd and embellished.
 Civil War Bride's design is definitely from a bygone era and it calls for a hand appliquéd look - BUT DID YOU SEE ALL THOSE LEAVES?  Since many of the leaves and flowers are the same shape and size, this pattern could possibly be a good candidate for a method where templates can be reused.  Therefore, I will probably go with the Karen Kay Buckley (KKB) method of heat resistant templates and starch.  This method will give me the look of handwork but at a much faster pace.
Baltimore Christmas is beautiful and delicate.  I'm afraid that any visible machine work will overwhelm the charm.  There are some repeated shapes but not many so I don't know if creating templates for the KKB method will save any time.  Some of the tiny pieces I would prefer to hand needle turn because dealing with templates that small would push me past the brink of sanity.  Maybe combining KKB for the larger, repetitive sections (like the ivy border) and hand needle turn for the remaining shapes is the answer here?
Here is the link to a previous blog that compares the various machine applique techniquest discussed above.

New and Noteworthy:
New Tutorial: I have added a new tutorial page, Clip, Clip, Snip, Snip, that illustrates the clipping technique I use for both inside points and inside curves.  These tips apply to all needle turn techniques - not just Template Free (Back Basting).  Enjoy!


Hand sewing needles and threadsI belong to several quilt-themed Yahoo groups and there has been quite a bit of discussion regarding the proper way to thread a needle, needle types/brands, and thread types and brands in order to get the best results.  First let me say that I have the upmost respect for all the stitchers that came before - without them we would not have this wonderful tradition.  However, technology has advanced such that many of the old rules no longer apply.  Thread, especially good quality thread, is a perfect example.  Thread twist (Z or S) does not impact hand stitchers as it did in days of old.  It makes no difference which end of the thread is pulled through the eye of the needle first.  The likely cause of issues usually attributed to thread such as knotting, twisting, etc. is your stitching motion.  The second most likely culprit is the needle eye being too small. However, don't take my word for it.  Becky Goldsmith (of Piece 'O Cake fame) wrote and incredible blog entry on the topic that I think you will enjoy.

Sandra Leichner's book, Hand Applique with Embroidery has arrived:  The theme of 2010 has been "Eagarly Awaiting."   Sandwiched on my list between Toy Story 3 and Michael Connelly's new novel was Sandra's book.  It arrived yesterday and it does not dissapoint!  If you only buy one applique book this year, this is the one to buy.  The material is fresh and the techniques are well illustrated and explained.  Caution, view carefully because you will be drooling over the photos of Sandra's equisite work.
Thaddeus Savage - Backyard Frisbee Champion!


Until next time...

Best stitches,
Mercy in Miami

Sunday, October 3, 2010

Two New Tutorials

Fall is officially in the air in South Florida!  The telltale signs include 1) the temperature outside in suddenly cooler than the temperature inside the house, 2) the tropical storm/wave/depression activity takes over the local newscasts, and 3) the birthday presents my husband sent away for begin arriving in the mail!  This is always a hoot and a half because he CANNOT keep a secret from me and he is terrible at finding hiding places.  My birthday is still a week away and I have already found two presents.  Maybe turning fifty may not be so bad after all!

Since the last blog posting I received several emails with questions specific to Template Free appliqué preparation.  The most common questions were:

When do you remove the basting threads?

How do you approach a design with several layers?

How do you stitch a point using this method?  How to do you ensure the point is perfectly placed.

Can you fussy cut fabrics and place them exactly as needed even though you are basting from the wrong side of the background?

I decided that the easiest way to answer these questions was to create another tutorial or two. 

I posted two tutorials today, Perfectly Placed Points and Finagling Fussy Fabrics.

If you need  a refresher on Template Free Applique preparation, study the tutorial, Pictorial Tutorial Template Free.

I will be posting Luscious Layers in the near future.

Until then, enjoy the tutorials and...

Best stitches,
Mercy in Miami


Monday, September 13, 2010

Template Free (Back Basting) Myths Exposed!


As a child I loved to play the game where you sat in a circle and one child would whisper a secret to the child on their right.  Then that child would whisper the same secret to the next one in line.  This would continue until the last child.  Then the first and last child would repeat their version of the secret.   Of course, each retelling would change the secret just a little bit.  The more children in the circle, the more the secret would transform.  My favorite was the time we started with "Donald Duck quacks me up" and ended up with "Mickey Mouse has warts.

Template Free applique preparation (also known as Back Basting) for needle turn hand applique has not been well documented and has been under represented by the quilt book authors and publishing houses.  As a "word of mouth" technique it has fallen victim to the several misinterpretations as it "went around the circle."  Basically, Back Basting has warts.  I had the wonderful fortune of learning this technique at the master's knee (Jeana Kimball) so I feel compelled to clear up some of the misinformation.

1. Trace the applique pattern on the wrong side of the background fabric.  Trace the pattern accurately and with care.  Use a pencil or any other marking tool that will not show through to the front of the background fabric.  This marking does not need to be removed EVER so there is no need to fret about marking tool brands, types, etc. or is there any need remove markings once the applique is complete.


2. Pin the applique fabric, right side up, to the front of the background fabric.  Hold the piece up to the light to make sure the applique fabric covers the shape completely including a generous 1/2 inch overhang around the entire shape.


3. Thread a FAT needle (I like a size 8 Sharp or Straw) with thick, glazed hand quilting thread and begin basting directly on the pencil line that outlines the applique shape.  The purpose of the basting stitches is twofold.  The basting stitches both score the applique turn line and define the applique shape.  Use a simple running stitch small enough to define the shape accurately.  The fat needle and glazed thread do the best job of scoring the needle turn line.  This is not the time to use up old, fuzzy threads.  They are not strong enough to score the line.
4. From the front, trim the applique fabric a scant 1/4 inch from the basted line. 
That's it!  You are now ready to needle turn applique as usual.

And, now the some of the misconceptions.


Myth #1: Template Free preparation takes longer than other methods like freezer paper on top.
Reality: You trace the applique pattern once, exactly as is, on the wrong side of the background fabric.  Then each applique fabric is pinned and basted on the background fabric.  That's it. You are stitching.  There are no templates to create, there are no window templates to create, there are no individual shapes to trace or cutout, and there is no overlay to create.

Myth #2: You cannot see your turn line so your shapes are inaccurate.
Reality: There is no need to see the turn line.  Template Free works on the principle that the purpose of the basting line is to SCORE the fabric EXACTLY on the turn line.  Then, when the needle sweeps the seam allowance under, it turns exactly on the scored line.
If you are still worried about losing the stitching line, you can finger crease the turn line by pressing the seam allowance against the stitched basting line.
Everyone has their favorite techniques and I can understand being reluctant to change anything that is working just fine.  However, if you have not been successful using other applique techniques then I encourage you to give Template Free a try.  I successfully use the Template Free technique for ALL my applique projects and I sincerely believe it's the answer for quilters that have tried all the other applique techniques without success.  Many of my students have told me they had given up on applique until they discovered Template Free.   Feel free to email me if you have been tempted to use this technique but have questions or if you have tried this technique in the past and ran into challenges.  I always welcome your comments.

Best stitches,
Mercy in Miami

Sunday, August 22, 2010

No (Color) Fear

If you had no fear of color, what car would you drive?  This car was in front of me in traffic.  I was late for an appointment but I could not stop myself from following it.  Finally, the occupants pulled into a chain restaurant parking lot.  I pulled in right beside them and took a photo of the car to share.   Well, not really to share but to have proof that something like this really exists;  the same way I would grab the camera is I ran into the Loch Ness monster or Santa Claus or the Easter Bunny.  At first my thoughts were "who would pay money for this?", "who would let a spouse spend money on a car like this?"  Then, my thoughts shifted to "who has the guts to buy something like this just because they like it?"  And it definitely takes guts and a bit of the "show off" gene to drive this vehicle around town and park it in front of your home.  Good for them. I admire someone that has so much self confidence that they can make an extreme, long term color commitment. And pull it off with style!  Did I mention the driver and his wife got out of the car wearing matching outfits?  
Think of how much we stress about picking just the right color fabric for a project.  A PROJECT!  Something that if it does not turn out as expected we can change it EASILY.  When we create a project we are only making a color/fabric commitment for that project.  If it's a commitment that we decide later on that we cannot live with then we can change the fabric.  Fortunately, many of us do not suffer from fabric shortages so we always have more to pick from.  A friend of mine, Rusty Miller, says that when you pick a fabric for a project you are not deciding to marry it, but only date it.  If you find out you don't love it, then you can always break up.    

This week's goodies.  Since we are on the topic of color, I will share I treated myself to several yards of Cherrywood Fabrics.  The photo does not do the fabrics justice.  The colors are from left to right, Icicle, Periwinkle, Turquoise, and Celery.  I also sent away for a new color card.  They have added deep, saturated reds.  Great reds are difficult to find in hand-dyed fabric so I'm excited.  My wish list ready for my next order.

Until next time...

Best stitches,
Mercy in Miami

Saturday, July 31, 2010

Setting Sail to the New World (Please pardon the shameless self promotion)


Thank you everyone for the good wishes and congratulations on our new endeavor - New World Quilt Company (NWQC).   Please pardon me hijacking my blog for shameless self-promotion.  But, I have received so many inquiries that I felt it was important to share with everyone what NWQC is all about and what we will be offering in the near future.  
We are hoping to have several original quilt patterns published and posted for sale by the end of the year.  All patterns include detailed instructions for BOTH hand and machine applique.
Currently, we have the first of the Aloha Collection patterns, Enchantment Under the Sea, posted for sale.  Future Hawaiian-style patterns will be published as part of this collection.

The next set of patterns will introduce the Tropical Botanical Collection.  The Tropical Botanicals patterns are realistic applique designs that depict the details of plant specimens similar to botanical illustrations.  These are a bit more challenging and are better suited to needle artist looking to stretch to the next level.  Here's a sneak peak at what's in the works.  Can you tell which were stitched by hand and which were stitched by machine?
Yes, the Gardenia above is machine appliqued!   The bougainvillea, Angel's Trumpet, and Hibiscus are all hand appliqued. 


 All blocks are marked and prepped waiting for me add the embroidery details.

And, many more on the drawing board!

Stay tuned for details of the third collection coming this Fall, Tropical Folk Art Collection!

There are a few hard-to-find notions that I find indispensable for my favorite machine quilting, machine applique, and template-free needle-turn applique techniques.  I encourage all of you to please support your local brick and mortar quilt shops and look for these notions there first.  However, if they do not carry these notions, you will be able to find then on the NWQC Online Store.
Here are a few of my favorites!
The sharpest, thinest blade embroidery scissors I ever used are made by KAI.  I lost my KAI scissors shortly after 911 to airline security.  They are impossible to find so I just moved on to a more expensive brand.  A few years ago I purchased a pair of inexpensive Omnigrid scissor for cutting paper and fell in love with the quality.  They had all the great characteristics of my old pair of KAI scissors and they soon replaced the expensive embroidery scissor in my applique basket.  Then one day I noticed that KAI was stamped on the blade!  That's why I loved them so much!!  My favorite scissors came back home to me!!!

My preferred hand applique preparation technique is the Template Free method.  This technique hinges on  basting the applique fabric to the background fabric with a thick needle and a thick thread to score the turn line. Size 8 Sharp needles do the trick!


My favorite applique needle is a Roxanne Size 12 Sharp.  It's one of the few needles that I cannot bend.  Plus the eye is always burr free so I don't have issues with my thread shredding.


Not everyone is a thimble person.  But if you are, I really like this hybrid metal/rubber thimble.  It's got the strength of a metal thimble, but the gripping, no slip ability of a rubber thimble.  Plus dimples to really hold the needle in place!


Awesome machine applique requires a quality, invisible nylon thread that really disappears!  SewArt thread is my favorite because it's very pliable and non-reflective.   The fact that it's inexpensive is a bonus!


For all machine work, a pair of quality thread snips is essential. Snip-Eze has incredibly sharp, thin blades with just the right amount of curve.  I can get in and trim as closely as I need to while my work is still in the machine, with needle down, and then just keep right on sewing. 


There are a few other notions available online.  Plus we will soon be carrying the large spools (1000m) of YLI #100 Silk thread for machine quilting.
I hope I have answered all your questions.  Again, I apologize for the infomercial and I promise to go back to my tutorial-style blogs with my next entry.
Until then, 
Best stitches,
Mercy in Miami

Tuesday, July 20, 2010

It's a New World


Wow!  It's been an few weeks and I have lots to share.  Where to start?  First, the workshop I am teaching for my guild next month.  Several readers and members of my guild have asked to see the Freeform Feather Workshop samples.  I have also received several questions regarding the differences between cotton, wool, and silk batting.  Here are the class samples using the various type of batting that I recommend.  The photo at the top of my blog is silk dupion fabric, quilted using Tuscany wool batting and 100 weight YLI silk thread.  Below are a few more class samples.  I added captions to describe the materials I used. Notice that the feathers stitched with wool batting are the fullest with the least amount of wrinkles.  That's why wool batting is my favorite. 


Commercial cotton fabric quilted using Tuscany silk batting and YLI 100 weight silk thread.


Commercial cotton fabric quilted using Tuscany wool batting and YLI 100 weight silk thread.

  Silk dupion fabric and YLI silk thread but using Tuscany silk batting.

Silk dupion fabric and YLI silk thread but using Tuscany wool batting.

Simplest feather - Silk dupion fabric and YLI silk thread but using Tuscany wool batting.

A few Pros and Cons based on my experience:

  • Wool batting is more expensive than cotton batting.  Silk batting is even more expensive. Definite CON for wool and silk.
  • Wool batting fluffs up to fill unquilted spaces to give a trapunto effect without all the extra work of trapunto.  My favorite PRO for wool.
  • Cotton batting lays nice and flat so it's easy to mark quilting designs even after the quilt is layered.  Both silk and wool batting are too fluffy to allow you to accurately mark a layered quilt. Definite cotton PRO.
  • Wool batting can be compressed very tightly so it's very easy to roll and maneuver a full size quilt in a domestic sewing machine.  Silk batting is even easier to compress.  Silk and wool PRO.
  • Silk batting drapes like fabric.  A definite PRO for clothing and wearable art projects.
  • Cotton batting can be heavy.  Wool batting is very lightweight.  Silk batting is light as a feather.  Can be PRO or CON depending on the application.

Secondly, I would like to share that I have officially published my first applique pattern.
"Enchantment Under the Sea" is a Hawaiian-style pattern that finishes 40 inches square and features Seahorses, Dolphins, Starfish, Seaweed, and Coral.  The packet includes a full size pattern, a 6 page traditional Hawaiian hand applique instruction booklet, and a 4 page bonus booklet that explains how to convert ANY Hawaiian style applique pattern from hand applique to machine applique without using any fusible or adhesive products.


I'm also making available copies of my "Freeform Feather Workbook" that I wrote as a companion for next month's workshop.  The booklet includes basic instructions on how to draw a feather and 20 plus feather designs to fill several different shapes (circles, squares, triangles, rectangles, etc.).


The pattern and workbook are available on the shopping cart page of my new, still in progress, website; www.NewWorldQuiltCompany.com  Because I have many original designs that I hope to also make available in the near future, my husband and I decided to start this small company dedicated to publishing my quilt patterns.  Our website is still under construction.  However, at your request we rushed the shopping cart page so that it is now available to take your online order for either Enchantment Under the Sea or the Freeform Feather Workbook.


To all of you that requested these items - I hope you are not disappointed and enjoy your pattern and workbook!


Until next time...


Best stitches,
Mercy in Miami