I love all types of appliqué. I get just as excited about intricate, perfectly placed, 100-plus piece per block, Baltimore-style blocks as I do a single folk art heart. Most of the time I am happy stitching on something in between the two extremes. Sometimes I just need it to be simple. These days I am in my Simple Zone.
However, what if I need it to be simple to mark and stitch but I want it to look complex? I have two favorite techniques to accomplish this. The first is to set the block on point. Any block will look more complex this way. Suddenly your piece is bigger and you now have beautiful setting triangles to quilt beautiful motifs.
The second technique to transform the look of simple into complex is also one of my favorite, easy appliqué techniques - reverse appliqué! Traditional appliqué has the stitcher place the appliqué fabric on top of the background fabric. The appliqué fabric is stitched onto the background. In reverse appliqué, the appliqué fabric is placed UNDER the background fabric. The background is cut away to reveal the appliqué fabric underneath. The background is stitched to the appliqué fabric. You can layer several pieces of fabric to make the appliqué look more complex but it's all easy because everything is securely basted in place.

Here is a green rosebud that was appliquéd onto an aqua background. The center of the green rosebud was reverse appliquéd to reveal a hot pink, polka dot fabric placed underneath. Looks difficult but is very easy to execute. The added benefit of using the Template Free or Back Basting technique for reverse appliqué is that the basting stitches secure everything in place and removes any risk of fraying and of fragile pieces coming apart or shifting. Refer to my blog entry Pinch of This and Dash of That for details of how I stitched this bud
I am currently working on a challenge piece for my local guild, Ocean Waves. My initial idea and sketch was a little more intricate than I really have time to execute. Out comes my bag of tricks. I knew I wanted the peacock feather eyes in the finished piece but I wasn't willing to appliqué 20 plus sets of concentric circles.
My peacock fabric was perfect but I did not think fussy cutting and appliquéing them onto the tail feathers was the right look. Then the heavens parted, a ray of light shone down, and I heard a choir of angels singing in perfect harmony.......reverseeee appliqueeeeeeee........amennnnnnn......
 Yes - I had a plan. I studied the peacock feather fabric and realized I would not even have to cut it apart. I would cut a chuck of the fabric in the shape I wanted the peacock's tail to take.
I then placed the peacock feather fabric face down (wrong side up) on the wrong side of the fabric I was going to use to stitch the main tail.
I basted all around the outside of the feather fabric to hold it in place. I then basted (using smaller stitches) around each eye in the feather fabric. I shaped each teardrop a little differently to add visual interest. I basted larger teardrops as I move to the bottom of the tail. I changed the direction of the teardrops to give the tail some movement.
After all the basting was complete, I appliquéd a single eye to make sure this was indeed going to work and give me the look I was hoping for. Reverse appliqué is stitched from the top - the right side of the background fabric. This is easy to do because the basting stitches exactly mark the turn line.

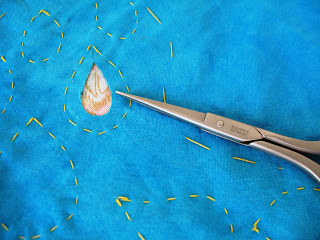
I prefer to use a seam ripper to make the initial slit in the background fabric.
I then used my sharpest pair of embroidery scissors to trim excess fabric and leave only the scant 1/8 inch seam allowance.
I clipped to the turn line in the cleft at the top of the teardrop. I made several shallow clips perpendicular to the turn line in the concave, u-shape, bottom of the teardrop. See my tutorial Clip, Clip, Snip, Snip for a refresher on proper clipping techniques.
I finger pressed my seam against the basting stitches to help score the turn line.
I was ready to stitch. I appliquéd the teardrop shape. YES, it was exactly the look I wanted and the feather eye was centered in the teardrop opening.
I was able to trim the blue tail fabric so that I would have a smaller piece of fabric to gather in my hand while I stitched.
I also pre-trimmed all the teardrops shapes so that I could preview the tail section. Fraying was not a worry because everything was securely basted. This was now a sturdy piece that can travel in my handwork bag.
Here is a sneak peak at how the tail will be incorporated into the design. For the rest you will have to wait until after my guild challenge in January.
The design idea, sketch, fabric selection, basting, and stitching were all completed in an afternoon. For those of you that do not know me - this is a record. I am going to have to come up with more designs that I can use this technique on. Fast, fun, and freeform thanks to Back Basting!
Best Stitches,
Mercy in Miami


