Monday, June 21, 2010

Once Again, Value Saves the Day!

Miami, my home town!  If you were a fan of the TV Show Miami Vice, you may recognize some of the high rises from the show's opening sequences.  If you are a quilter you may see other things; like block layout ideas, quilting patterns, value patterns, or a potential color scheme.  The "lesson" I am learning by studying this photo is that the color palette is very limited yet there is a ton of detail that is clear and distinct.  The reason is value.  In this particular photo, value is doing all of the work.

I can enjoy a quilt if the color is not my personal taste or if I don't care for a fabric print.  However, for a piece to work, the value must be on target.  If you would like to read more about the importance of value, read my blog entry I Owe, I Owe, It's Off to Blog I Go.  For a general color theory refresher and how value and color work hand in hand, you may also wish to read Color Theory for Quilters Exposed.

Value is not just limited to fabric choices.  It's also very important when choosing embellishments.  Waterlilies is a small wall hanging that is part of my Tropical Botanical series.  It has been kicking around my UFO pile since 2002.  I had never been able to finish it because I had never been able to decide on the embroidery thread.  Nothing I tried looked right.  I have ripped the embroider out of the lily pads and the stems at least half a dozen times if not more.  I dragged the piece to the Quilt Festival in Houston in 2003 and the AQS show in Paducah in 2004 desperate to find the right color floss, thread, anything to finish the wall hanging.  In 2005, I put it away. 

Fortunately, as quilt makers we learn from our mistakes and are constantly evolving.  Since I put Water Lilies down I have had the "value lesson" burned into my psyche.  I had also learned quite a bit from working on my Baltimore Album BOM project.  In fact, Baltimore BOM Block One Split Leaves tells the tail of my embroidery thread "Ah Ha" moment (Tips #2 and #3).

The issue was 3 fold.  First, I was using embroidery floss that was the wrong value and just melting into the background.  Second, I was using a color that was boring it was ugly.  And third, the floss was thick and out scale.  The lily pads looks so heavy I thought they would sink if a single mosquito landed on them.  Notice how heavy the purple highlight on the stem is.  Notice the disappearing veins in the water lily on the right side of the stem.

I also kept trying to embroider the water lily petals themselves.  Even a single strand of floss was just too heavy.  See the bud on the left. 


Armed with my lessons learned I tackled the wall hanging once again.  I began by auditioning all type of fibers - machine embroidery thread, sewing weight thread, perle cotton, machine quilting thread, hand embroidery fibers, etc. 
Everything I tried out was OK... but just OK.  Nothing was making my heart sing.  So I turned to my tried and true inspiration, my garden.  However, it's been VERY hot so at this point, my garden is very neglected.  Turns out it's true what they say "One man's weed is another man's wild flower."  The "wild flowers" were the perfect inspiration.   I think the pink/red highlights on the stem are beautiful!  I especially like the pink/red on the distressed leaves. 


Once I began trying out the threads in the red/pink/burgundy family, I was able to finish Water Lilies. 


The petals look much more natural with only a single strand of floss to highlight or shadow select petals.


Close-up of the lily pad shows the dark pink embroidered veins.


 Responses to requests by blog readers:

More Tips- Your emails are asking for more tips, especially regarding handwork. Here's a favorite hand embroidery tip. Everyone has heard that thread has a nap. One should thread the needle on the end that the thread comes off the spool and knot the end that is cut. The same applies to embroidery threads. But if you cut one end and only pull out a single strand, then how do you remember which end was the one you cut when it's time to pull the next strand? My solution is to make a very loose knot at the end I cut as soon as I cut it. 

 I then undo the knot to pull my strand(s) out and redo the loose knot immediately.


Sneak Peak at what's on my drawing board.  I'm refining another Tropical Botanical pattern.  This one is called Gardenia and it's one of four block in a wall hanging.  The other three blocks are Bougainvillea, Hibiscus, and Angel's Trumpet.  They are stitched and ready to be embroidered.  

I have received several inquiries from readers asking if my patterns are available for purchase.  I am currently investigating the best way to make this happen.  My goal is to have a few of my patterns available midsummer so please stay tuned for more details.

Finally, thank you AQS for selecting Tropical Appliqué as their Blog of the Week!  I am truly honored.


Best stitches,
Mercy in Miami
(aka The Savage Quilter)


Magnolia blossom I photographed on the grounds of the National Quilt Museum in Paducah, Kentucky.  If you have never been to the museum, definitely add it to your "Things I must do before I need a walker" list!

Thursday, June 10, 2010

Quilting Heals All Wounds and Lessens All Longings


Hi gang!
Like most quilters I love flowers.  This is the first year that I have had more space than just a tiny patio or apartment balcony to flex my greenish thumb - after all I am a farmer's grand daughter.  I'm disappointed to report that the farmer gene must be a recessive gene.  I'm strictly a "container" garden type of gal.  Everything I plant in a pot like my bougainvillea on the left or my African violets at the top of the page are thriving.  Everything else is a tragedy.  I also discovered a few other important facts; 1 - It's really hot OUTSIDE, 2 - The really BIG bugs live OUTSIDE, and 3 - There's a lot of dirt OUTSIDE.  My conclusion  - OUTSIDE is really beautiful when viewed from the INSIDE through big glass windows and doors (ahhh air conditioning).  

I also love the ocean and am fascinated by the creatures that live in the sea.  Flipper was my favorite movie as a kid.  The Seaquarium was my favorite school field trip (even though MacArthur Dairy gave out free ice cream samples).  While my friends were reading National Velvet and pleading with their parents for a horse, I was always begging my dad to take me fishing with him.  I dreamed of a pet dolphin.  Long story short - I get sea sick standing at the edge of a pier.  BUT I'M A QUILTER!  Quilting heals all wounds and lessens all longings -which explains my current Hawaiian-style applique theme obsession; Under the Sea.   I just started a new wall hanging (shown here pinned to my "design wall" that doubles as living room curtains).  I have drawn, cut and pin basted the entire piece.  It should finish at between 40 to 42 inches square.  
The center is my favorite part of the design and I'm thinking for a future project to applique four centers and then piece into a larger square (2x2).  A wave design border would finish it off and make an adorable baby quilt.  


But then again, I love the seaweed, coral, and dolphins in the border.

The pattern is based on my miniature quilt, Enchantment Under the Sea (shown left), that finishes at 13 inches square. The miniature size was inspired by Diane Gaudynski's A Visit to Provence which won first place in the miniature category in AQS's Paducah show in 2004. It's hand appliqued and machine quilted.  Quilting close-ups below.

The inspiration to NOT echo quilt it like a traditional Hawaiian quilt was a combination of Diane Gaudynski's classes and a sculpture at Disney's Animal Kingdom in Orlando, Florida.

Responses to requests by blog readers:
1.  How to make a Bullion Knot - I found an real treasure!  It's an incredible website by Mary Corbet that has a terrific video of how to make a Bullion Knot.  The trick to these knots is to slow down and to use a needle with a very small/narrow eye such as a milliners or sharp needle and not a crewel or chenille needle.  Remember that all the wraps have to pass over the eye of the needle so make it as tapered as you can.


Request from blog reader of a closeup of how I free motion machine quilt hand applique and embroidery.  This is Shirley Bloomfield's block Summer Bounty that I free motion machine quilted for her.   The best tips for how to machine quilt hand applique and hand embroidery are on Sandra Leichner's blog.

Sneak peak at what else is in the works.   Sunflower blocks in progress - used Template Stamps by Cindy Blackberg.  The plan is to set the sunflowers into square blocks then set the blocks on point leaving enough space for a touch of applique and of course, my favorite -  lots and lots of free motion machine quilting!

More flowers from Key West - photo take in at the Hemingway House gardens.

Fabric guard dog on duty!
A last word before I close out this entry.  Some of you may have noticed the photos of my quilts and designs obscured by a copyright stamp.  I apologize for not presenting a clear and larger view but I have been forced to protect my work.  I consider myself a nice person and really like to share with fellow quilters.  However, out of common courtesy, please email me and ask permission to use any content contained in my blog for purposes other than personal use and enjoyment.

Until next time...
Best stitches,
Mercy in Miami
aka The Savage Quilter

Saturday, June 5, 2010

To Knot or Knot to Be ... Plus Inspiration from Key West


Hi gang!
I have started block 9 of my Baltimore style quilt.  Block 9 is a fruit basket.  I'm using Sandra Leichner's pattern, Traditional Still Life.  By the way, for Sandra's fans, she has made several of her patterns available for sale on her website.  That will have to hold us over until her new book is published in October!


So far, I have only completed the pineapple that sits at the top of the basket.  I love to applique pineapples.  They are large, beautiful shapes that come to life with the simplest of embellishments.  For this pineapple, I used a chalk pencil to mark a simple grid on the diagonal.  I then used two strands of silk floss to make a colonial knot at each intersection.  I really like colonial knots because they nestle into the fabric with the "knot" sitting upright.  They are especially nice if you pad the applique piece with a thin layer of batting.  The knot then accentuates the dimensionality/stuffed effect. They do not flop over like French Knots.  Unlike a French knot, you cannot make the knot bigger by using more wraps.  Instead to make a bigger Colonial knot you need to use more strands of floss or use a thicker floss.


Colonial knots are not as common as French knots so many quilters are not familiar with them.  But, they are so quick and easy to stitch, and so versatile, that I decided to create a quick tutorial for my blog readers.
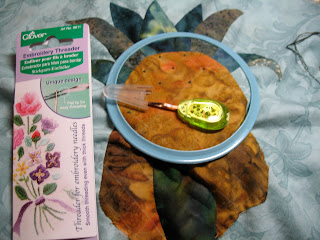
First my favorite tools.   I love this Clover Embroidery Needle Threader.  Unlike other needle threaders, it's sturdy enough that when you pull on it the "wire" it does not pull out or come apart in your hands.  It's thin enough to thread smaller embroidery needles but has an opening large enough to thread larger fibers.


For thicker embroidery threads or silk ribbon, I really like Clover Gold Eye Chenille Needles.

My other "Must Have" is Thread Heaven.  It really does tame the most unruly threads.  I wish the manufacturers also made hair care products!


To make a Colonial knot, thread your needle, pass your floss through the Thread Heaven, and hoop your  fabric.  I prefer Spring Tension 3 1/2 inch Embroidery Hoop.


Start the stitch by coming up from the back to the front right where the stitch will be.  Pull the floss toward yourself with your left hand.


Point the needle away from yourself and scoop the floss from left to right.


Then with your left hand wrap the floss up, over and under the needle to create a figure eight of floss.


Gently pull the floss with your left hand until the knot is formed around the needle.  Pull until the knot travel down to the tip of the needle.  Then insert the needle into the background right next to where it came up originally.


As you pull the needle slowly through and out the back, control the loop on top with your left thumb.


After you pull the floss to the back, travel between the background and the foreground to the next spot for the next knot.  This helps keep the background a little neater.


The stitch is really very simple, but a little complicated to explain; especially the up, over and under step to make the figure eight.  Since a picture is with a thousand words, a video should be worth a million words.  Here is a short (90 second) video,  How to stitch a Colonial Knot , that my husband recorded of me stitching a Colonial knot.  Hopefully, between the video and the instructions/photos above you too will soon be embellishing your projects with a new stitch!
While downloading the photos for this blog I came across a few snapshots from a trip to Key West in January.  The first photo at the top of the blog and the one immediately below is from Hemingway's house.   The rooster and hen are from a gas station parking lot.  I hope they inspire you like they do me!


What a great quilt setting!


Beautiful color - touches of brights in a sea of neutrals.  Nice.


Until next time....
Best stitches,
Mercy in Miami
aka The Savage Quilter